Advanced Car Training: Ignition Picking and Key Code Lockouts
1. Picking GM Ignitions (B102/B106 and HU100)
Tools Needed
-
Lishi Tool (B102/B106 or HU100)
-
HU100 IRT (Ignition Removal Tool)
-
Tension Wrench
-
Key Blank for Testing
-
Key Cutting Machine
-
Flat Screwdriver
-
Proper Lighting (like an LED Penlight)

A. Steps for B102/B106 Ignitions
-
Learn the Lock Mechanism
-
GM ignitions use sidebars. Sidebars connect with wafers inside the lock.
-

-
Insert the Lishi Tool
-
Choose the correct Lishi tool (B102/B106).
-
Gently insert the tool fully into the ignition cylinder.
-
-
Find the Binding Wafer
-
Add light tension with the tool’s arm.
-
Use the pick part of the tool to find the binding wafer (the one that feels stuck).
-


-
Set the Wafers
-
Push gently on each binding wafer until it sets.
-
Repeat for all wafers while keeping light tension.
-
-
Turn the Cylinder
-
When all wafers are set, the sidebar will release.
-
Gently turn the cylinder to unlock it.
-
-
Test the Lock
-
Use the Lishi tool to find the key code if needed.
-
Cut a new key using the key cutting machine.
-
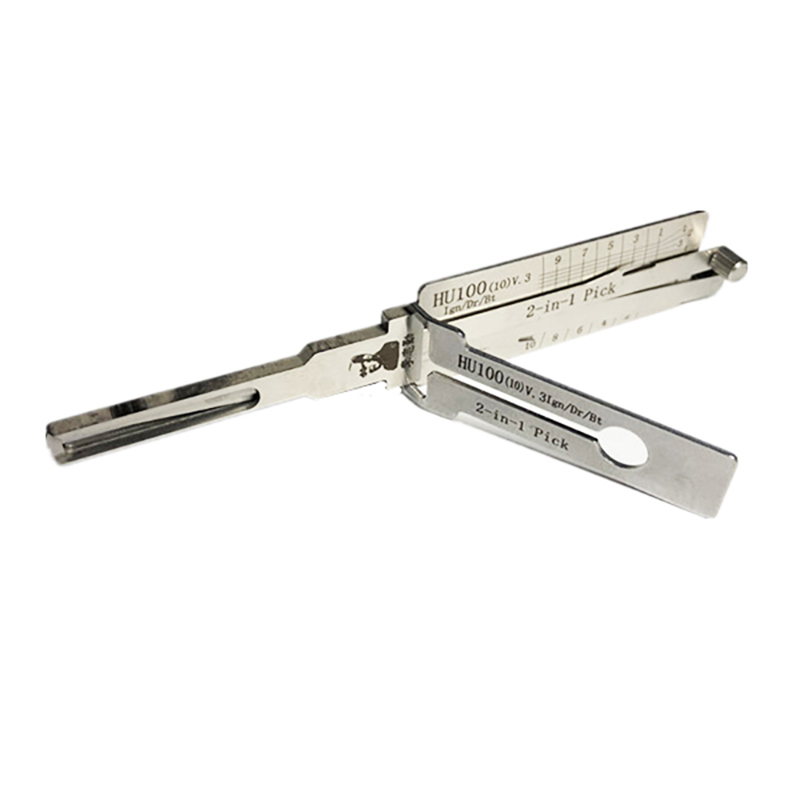
B. Steps for HU100 Ignition Picking

-
Choose the Correct Lishi Tool
-
Use the HU100 Lishi tool.
-
-
Insert the Tool
-
Fully insert the tool into the lock.
-
Apply light turning tension with the tool’s arm.
-
-
Find and Pick the Wafers
-
Move the tool’s pick arm to find each binding wafer.
-
Gently lift each wafer until it clicks into place.
-
-
Turn the Ignition
-
Once all wafers are set, turn the tool to rotate the lock.
-
-
Optional: Use HU100 IRT Tool
-
If you need to remove the ignition, use the HU100 IRT tool.
-

-
The key code will be stamped on the ignition cylinder.
-
Cut the Key
-
Use the key cutting machine to make a working key.
-
2. Key Code Lockouts (Honda/Acura)
Tools Needed
-
Flat Screwdriver
-
Honda Lishi Tool
-
Key Cutting Machine
-
Diagnostic Tool (e.g., Autel IM508)
-
Key Code Database (like Honda iN or NASTF)

Steps for Finding Key Codes
-
Verify Ownership
-
Check the car owner’s ID and vehicle registration before starting.
-
-
Locate the Key Code
-
Option 1: Floor Lock
-
Check for the key code next to the driver’s seat on the floor lock.
-
-
Option 2: Glove Box
-
Look for the key code sticker inside the glove box.
-
-
Option 3: Trunk
-
Some Honda cars have key codes stamped on the lock inside the trunk.
-
-

-
Cut the Key
-
Enter the key code into the key cutting machine.
-
Cut the key blank to match the correct key cuts.
-
-
Program the Key (if needed)
-
Use the Autel IM508 tool to program the key.
-
Follow the tool’s on-screen instructions to pair the key with the car.
-
-
Test the Key
-
Insert the key into the ignition.
-
Make sure the key turns smoothly and starts the car.
-
3. Practical Training Plan
Week 1
-
Practice on HU100 (GM), HU101, and CY24 (Dodge/Chrysler/Jeep).
Week 2
-
Use the HU100 IRT tool to remove ignitions and read key codes.
Week 3
-
Go to a junkyard to practice on Honda cars.
-
Find key codes on floor locks, glove boxes, and trunks.
-
Take out the locks and practice with them.
-
Week 4
-
Practice reading wafers using Lishi tools and cutting keys with the key cutting machine.
4. Tips for Success
-
Practice on Dummy Locks: Use old locks to learn without pressure.
-
Be Gentle: Use light tension to avoid binding wafers.
-
Stay Updated: Learn about new car models and tools.
-
Verify Ownership: Always check car ownership before starting work.
-
Use Technology: Use tools like Autel IM508 and Lishi tools for faster, better results.